But some of the curtains needed altered to hang above our radiators. So I cut and re-hemmed them. (Because doing that was easier than trying to find just the right sizes in the store. I really wanted to SEE the curtain fabric in person instead of ordering online. Browns come in so many different shades!! This is not a bedroom so they didn't need to be black-out curtains.)
And this is the scrap that I cut off.
But turn it around and that's going to be a valance for the upstairs bathroom!
This is what the bottom (soon to be top) of the scrap looks like.
It's sewn shut along the edge.
So using my seam ripper, I gently pulled out those stitches, so it's open again for a curtain rod to go through.
So using my seam ripper, I gently pulled out those stitches, so it's open again for a curtain rod to go through.
Now, the dashed lines indicate where you need to sew.
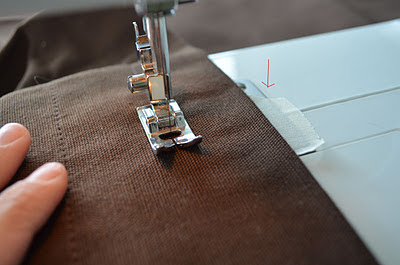
Now to sew that top dashed line... I'm just sewing straight through the hole, so that instead of the curtain hanging straight down from the curtain rod, it will have a little ruffle ABOVE the rod. The guide lines on my sewing machine are too close to the edge of my fabric. I want a larger ruffle, so I use masking tape to mark my line. I used to draw a pencil line ON my fabric but using the tape was way easier and saved time. So instead of your eyes looking at where the needle is going up and down and making sure you're sewing on a pencil line, your eyes look at the edge of the fabric and the edge of the tape and as long as that is lined up, you'll be sewing straight.
The top ruffle should be done now and the curtain rod can pass through. Now hem the bottom and the curtain will be done. So double-fold over the bottom of the fabric, pin, and iron (I like ironing before sewing, it helps the fabric lay flatter and not shift so much as I go along.)
Then sew as close to the fold line as possible.
All done and ready to hang! (this is the back view of the valance)
To make valance look bunchy instead of just flat across the window, make TWO panels following these directions. Here is the bathroom before...
And now...
Closer view
They're really basic, but it's better than the NOTHING we had there. And better than the lacy thing that used to be there when we moved in. And I'd rather be resourceful than continue searching for THE perfect fabric. (our colors in there are brown, purple, and green, and I just wasn't finding anything. Not to mention we don't really even live anywhere near fabric stores like that.) So wa-lah! Project complete!!


No comments:
Post a Comment